Preparing your photos – merging two scans

I recently received an enquiry from a Findmypast family tree user about uploading scans, and I noticed only half of the birth certificate was scanned. This is not uncommon, since certificates are printed on paper that is awkwardly a little longer than an A4 page, which is even longer than Letter size (for any North American readers), which is the limits of most home scanners.

Don’t despair, there is an easy solution to merging scans into one image file, and I will try to explain the steps here.

Please note, the software I use is a free package that I am familiar with, but there are many other free and paid for packages that you could use. The principles of the process described will be the same.

I have chosen to use Paint.Net. It is simple and free, although they do appreciate donations to help with development costs. It is however a Windows product, so not suitable for Mac or mobile tablet, except Surface. It can be downloaded from here, http://www.getpaint.net/download.html Warning when you get to the PDN download page, don’t click on the big green button, go to the link on the right.

001a - download paint dot net

After downloading and installing, your ready to go.

First you need to scan you’re document, if you’ve not already done so. Try to line it up against the baseline corner the scanner. It doesn’t matter which way round you scan as we can correct that later. But it helps to get it matching the edge. After you have scanned one side, flip the document 180 degrees around, and scan again. You should now have two images with a distinct area of overlap, albeit one will be upside down.

001d - census combined parts

Open the two images in your image application. Take the one that has the left portion first. If it is upside down, then you need to rotate the image by 180 degrees. This is under the Image menu option. In my example this is not needed for the left portion.

001f - rotate image


Now you need to expand the “canvas”. This is the area that the image covers. Still on the Image menu option, you will see Canvas Size … the ellipsis is a standard Microsoft Windows indicator that a options window will follow.

001g - increase canvas size

The existing size is shown. We will over estimate and increase the size to 1000 pixels wide, and just to cover any slight variation in height, we will increase slightly to 500 pixels. I will also make sure that the size changes are to the right, and above and below, by selecting the middle left square for an anchor position.

001g - new canvas size

I now need to open the second and ensure that is in the right rotation. In my case it is upside down so I sue the rotate 180 degrees mentioned above.

On this second image, now in an upright position, I then choose Select All (CTRL+A) from the Edit menu. And still on the Edit menu, I select Copy (CTRL+C).

I flip back to the first image, use the open image selector at the top, or ALT+TAB.

001h - open image selector

Once the larger first image is back in focus, from the Edit menu, I select the Paste into new layer. This is very important as this will allow you to shift the image into position. Initially, after pasting, the second image will appear anchored to the top left corner and highlighted with a dotted line.

001i - new layer

When you hover over the pasted layer, you will get an arrowed cross. Click down and hold down and then drag your mouse. As you drag the mouse the image will move. If you are careful, you will be able to shift the second image into a position where the overlap covers the original image below.

001j - overlapped new layer

Now you want to trim the excess. I use the rectangle select option from the toolbox. This is the icon in the top left corner of the tools.

001k - toolbox

I start by clicking in the bottom right hand corner of the image where I want to start the trimming. I click down and hold, and drag the mouse all the way to the top left hand corner.

001l - trim select

The from the Image menu, select Crop to selection. You now have the blended image. I normally choose Save As at this point and give it a new name (AND REMEMBER to save as Jpg, not the default Pdn format), so that if I have to repeat the process I can. Once saved, you can close the images and your image application.

You now have a single image from two separate scans. I hope you found this post helpful. If you have any suggestions for improvement, please leave me a comment.

Thank you


Uploading media to tree in IE8 and IE9

Are you using Internet Explorer 8 or 9, then please read on for some useful tips on media handling in the Findmypast Family Tree. Unfortunately these browsers are unable to support some of the more advanced browser features, such as HTML5, which allows web developers to build more advanced and user friendly websites. One particular feature that suffers most is the area of uploading media. As a result we have built an alternative method, and I explain how to use it here.

Uploading a new media file

If you go to the Media section of any profile, or the Media section under settings, you will see an Upload a file option with a Browse button.

IE89 - 001a -upload a new image

Click the Browse button to select the file. A file open dialog will appear, and you should browse to the folder where your photos are and select one file. Click on open.

IE89 - 001b -upload a new image

It will immediately start to load. When loading is complete, you will then be able to edit the details of your photo. The photo is already saved, but this allows you to save a new title and/or description, and select the photo for a profile picture.

IE89 - 001c -upload a new image

Complete these details and hit Save and you will be returned to the Media page with the new photo listed first.

IE89 - 001d -upload a new image


Attach a profile photo

Unfortunately, the upload new does not work from the profile image, so your either best to just upload a media as above and choose set to profile first time around or you can attach to an existing image if the image already exists.

IE89 - 002a -attach existing

Choose Use existing, and you will be directed to an image picker page. IE89 - 002b -attach existing

The most recent 20 images are shown. Either you can select one of these, or click load more at the bottom of the page, or you can use the filter to narrow down your search.

IE89 - 002c -attach existing

Then click on the image you want to use and save. This will then place the selected image into all the profile spots for the chosen person.

IE89 - 002d -attach existing

And that’s it. Hope this helps.

Starting over – part 2 – Adding a profile photo

Okay, so last time we started creating our tree once more – or should I say 5 times more. The sites I have chosen to use are Ancestry, TheGenealogist, MyHeritage, Findmypast and Genes Reunited. So far, I have created my root person (me), and populated with very basic information, that I obviously know. And now, I just want to add a little colour, so I thought let’s start by adding a profile photograph. I will start the process by choosing a nice simple solo portrait of myself.

Philip Gordon Moir

Genealogist – I wasn’t sure where to look, so hovered over the person node in the pedigree view. Just as I was looking down the list of options and just before I chose edit individual, a new tool tip appeared over the person’s silhouette, for adding an image. This opens up a modal with a choose file selector. I select my picture and upload. A few seconds later, and the pedigree view refreshes with my photo in place.

TG - 003 - add profile photo - combined

Findmypast – OK, so this doesn’t have a nice simple tool tip that pops up, and instead when clicking on the node in the family view, and get a modal that gives me various options, including “Their tree”, “Profile”, “Edit”, etc. , but nothing about adding a profile image. I suppose I may be editing the person, so click through to edit. Nothing here, and nothing when I hover over the male icon. There is a (small) link to full profile in the bottom right hand corner. I try this and I’m taken to the main profile page. This time when I hover over the male icon in the top left, I get the pencil (edit icon) appearing, and clicking on this gives me two options, upload new or use existing. I could be picky, and say that I have no images loaded so why suggest use existing, but after the first one is loaded, you’ll always have both options. I obviously select upload new, which takes me straight to the file selector. I choose my image,select open, the findmypast spinner rotates in the profile icon slot, and then the Add details page is shown. This lets me add a title and a description, and the check box to set this image for the profile picture is already checked. It has taken the file name for both title and description. While the title is fine, I decide to be more explicit about the description. It’s a little limited on fields, but okay for just now. Click save, and then I’m back to the profile, once again with a lovely circled portrait of myself.

FMP - 003 - add profile photo - combined

Ancestry – This works very similar to TheGenealogist, in that initially the hover over gives you a modal of options, but then, if you hover over the silhouette on the modal,you get the tool tip to add a primary photo. Ancestry is never short on options, and there are a few on the page that greats you. But before you add your files, there is a disclaimer to accept for “I accept the Terms & Conditions and the Content Submission Guidelines”. These are actually worth reading. The T&Cs are general for the site, but the submission guidelines directly relate to the images, videos,audio and stories that you might upload. Although in principal the same rules and guidelines apply to the other sites, it helps that there are clear links to this documentation before you upload. I check the T&Cs option, and choose “Select Files”. In this case I only want one,and when I click on Open, like FMP this takes me straight to a details page for more information to be added. This provides a few more fields, such as date and location, and also has an attach to other people option. On saving, I get taken back to the pedigree view, once again, with a little picture of myself displayed.

ANC - 003 - add profile photo - combined

MyHeritage – This seems to be the simplest. A small (actually it is pretty small!) camera below the male icon on the family view, when hovered over tells you to add photo. A modal appears with upload a photo to Philip Moir, and a choose file button. I select my file, click open and immediately a copy of the image appears. And then I can click upload. A spinner appears briefly, and then my profile is in place on the family view. Very quick. Only gripe is that I didn’t get the chance to add more detail, but since the exercise was to add a profile shot, then that is exactly what I was able to do.

MYH - 003 - add profile photo - combined

Genes Reunited – And lastly once again to Genes Reunited. This is a little awkward, but it is worth bearing in mind that Genes Reunited has a concept called Keepsafe that lets you store photos outside of your tree, and also the tree runs in a separate tab from the main site, so you will most likely have two browser tabs open. In the tree view there is nothing obvious on the person node. The edit panel slides out from the right, and the second tab along says photos, and when clicked there is an upload button. Clicking on the upload button appears not to do anything on the face of it, but in fact the action is happening on the other tab. Switch back to the main site, and you will see the Upload to Keepsafe modal has opened with the ubiquitous choose file button. I select my file, and then click on the file chosen – click next button. I enter a mini wizard at this stage, and am prompted for a title, which is pre-populated with the file name, and category. On uploading, like FMP and Ancestry, I am presented with an editable details page. This by far gives the most options. Not only is their title, description, date and location, I can add tags, set privacy options, add private notes, attach to multiple people and even select a folder to save the image in. I save the changes and am viewing the non-edit version of the image details page, but I’ve not really set the profile. It’s not obvious, so I will just guide you. In the My Information box, my name is a link, click on this to go to the media section of the person’s profile. Now hover over the item in the media panel, and click on the Set Profile Photo button. Now you can choose what part of the image to use for the profile. Although this is a very long winded route to setting the profile, this is the first site that has let me choose a part of the photo for the profile. In this case I leave it as the default top square.

GR - 003 - add profile photo - combined

There you go, the simple and the less than simple. But even the less than simple options have their benefits.

Next time I will look at adding more information to the profile.


Starting over – building you tree from scratch

This weekend I decided to revisit the 5 main subscription based websites offering family tree tools that let you create your own private family tree, and start creating my tree on each from the beginning. I wanted to look at the weaknesses and positives of each. I have excluded Family Search and Wiki Tree as they are “one” tree websites, and that is not the focus of this challenge.

The five chosen are Findmypast, Genes Reunited, Ancestry, The Genealogist and MyHeritage. You may have other choices, but these are the ones I am most familiar with and the ones I would consider spending money on to look at records. The option for building a family tree on each of these is FREE. That is the basics of tree creation and research storing. On some of the 5 sites there are options that cost, but on others these options are free.

Let’s start from the point that I have registered a FREE account on each of the five, and I’ve clicked on the various Create Tree option.

Genealogist – First I must name the tree and save. I’m then given an empty pedigree view with two options of either adding an individual or importing a GEDCOM. I chose to add an individual. I can now enter name and birth details, gender, indicate if it’s me, include email address. Death options are also active. The date selector is fiddly and expects a “date” – so option for maybe or about is not there. It also does standardise the date, but after I have clicked save. The modal was small and well packed, but I could see all the fields presented. The location has not suggestions. I click save and am taken to the pedigree view, with add mother and add father very visible. Not sure about tree privacy at this stage.

TG - 001- start tree - combined

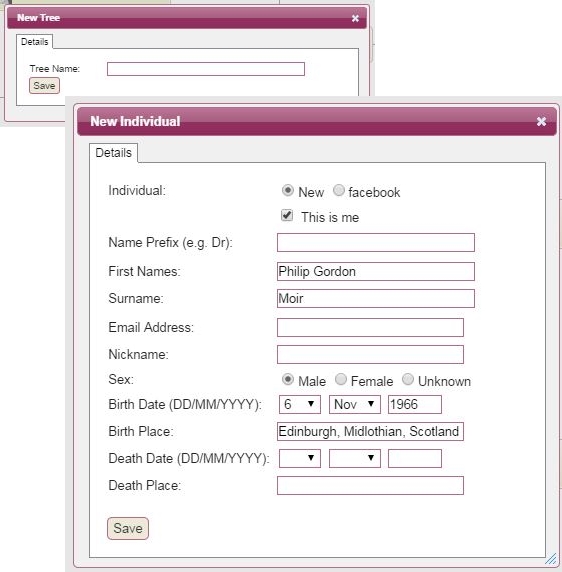
Findmypast – Here I have to immediately enter my starting person with name, birth details, gender and living or deceased, indicate if it’s me, and it preselects a tree name for me, which I can override. Death options are visible but disabled until flagged as deceased. There is a public tree option – unselected by default. Good, as I may want to consider making it public at a later date, but for the time being I keep it private. There was a tool tip on the public tree option, but it was a little sparse on explanation. Bonus, it standardised my date into a neat format, and gave me location options as I typed, although the chosen location was a little long winded in text. The size of the modal for creating the tree was taller than my laptop so I had to scroll to see all the fields. After saving I am taken to the family view with add parents above and a plus below.

FMP - 001 - start tree

Ancestry – I am straight into the pedigree view, with the empty levels shown, and add new person at the root. I click on add person, and get a clear and clean modal with all fields visible on screen, starting with the it’s me indicator (pre-selected). As I complete each field available, I get a tick box to indicate it’s complete (or correct – not sure) except the Birthplace. The death options don’t display until you indicate deceased. It asks me to click Continue, but interestingly I still haven’t created the tree. Before I can fully create the tree, I need to go further. I don’t want to add more details at this point but am forced to (first time I tried to just go to the tree it didn’t save what I’d previously entered and it was lost. So I click on add father with surname pre populated, and am forced to choose between living or deceased, and then click continue. I can now name my tree although it is also pre populated with surname suggestion again. It has pre-selected “Allow others to view this tree”, which I don’t believe is the best choice for a beginner, so I have to remember to remove this option, and save. Now I’m on the pedigree with add mother from me, and add parents from my minimalist details father. ANC - 001 - start tree - combined

MyHeritage – The create on-line family tree form pre populates my name, gender and year of birth from my registration details, but I have to add in my middle name, and I cannot enter my date of birth, only the year. The location field was the smallest of all so far, and there was no place suggestion. I also have fields for my mother and father’s name and their email addresses. I don’t want to do this now so just click go. Oops, like Ancestry I have to add my father’s surname. Err,a bit odd, as it could have actually pre populated it, but okay, so I fill in my father’s surname. And hit go. Like The Genealogist, I’m not sure about tree privacy at this stage. After this I am left on the Family view with two nodes, plus signs of each, and a side panel on the left to see more of the focus person.

MYH - 001 - start tree

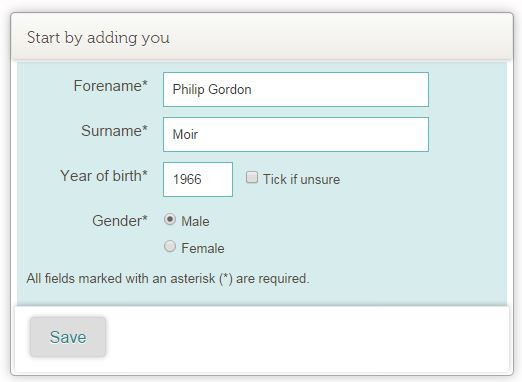
Genes Reunited – Very simple starting modal, with names, birth year and gender. No location, no privacy options. After saving, I end up with Family view, and add mother and father nodes. The edit panel is on the right, but hidden from view by default.

GR - 001 - start tree

Check security settings

Okay, some of the family trees offered me the security options up front, but I want to set the others, and I want to check the options on all. At this stage,I don’t want to make my tree public, so here’s what you need to do.

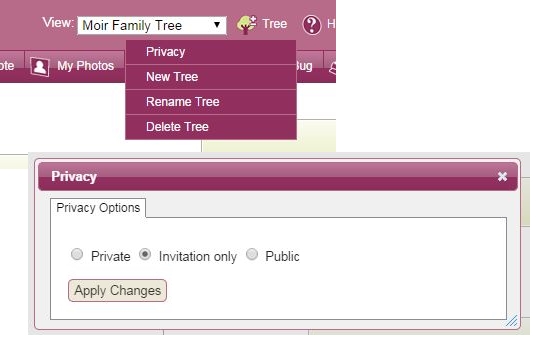
The Genealogist – It took a moment to work out where to go, but the menu item for the Tree was the correct obvious choice, and top of the list was Privacy sub menu. The privacy choices are plain and simple,private, public and invitation only. Although there is no explanation of what the choices mean. I choose private as it seems most secure. There was no mention of living relatives being hidden in shared trees.

TG - 002 - privacy - combined

Findmypast – The cog leads to tree settings, and this exposes a few more options in addition to privacy. I can set the home person, can set who I am, change the name of the tree, and then there are 2 privacy options. Show living – and a tool tip attached to a side question what’s this? explains about allowing others to see living relative details and only use when sharing with known family. Public tree – and the attached question why should I make my tree public? explains that it allows you to connect more easily with others. Actually, setting to public or private doesn’t stop you connecting, it just means people can look at your tree without explicit permission. It’s worth noting that if you do choose public tree, you can not set show living. Good measure to prevent setting both on by accident. I leave both blank. No need to save as I made no changes, so cancel back to the tree.

FMP - 002 - privacy - combined

Ancestry – The tree pages menu seems a bit oddly named, but leads to the tree settings option. This has three tabs and the second one is privacy settings. Here there is a detailed explanation of what the privacy options are, what they mean, and how it will affect your experience. There is even a link to an additional page explaining their privacy policy. This is very good and sets an information benchmark that all genealogy sites should strive for. There is a also an option to hide your tree from searches. This seems to be everything you might need.

ANC - 002 - privacy - combined

MyHeritage – Take the manage trees option under the family tree tab, to first see a summary of all the trees you have, and to get access to the edit tree settings. This is an interesting alternative page of settings,and one that is definitely worth mentioning. MyHeritage promotes multi ownership of family trees, even suggesting that successful sites encourage members to participate and add content. Having dealt with a lot of genealogy website users and their concerns and issues over privacy and ownership, I don’t necessarily agree. But at least you have the options. I switch off allow site members to download the family tree, and also switch the edit permissions to only you (me). Although the link to privacy is on this page, I click save to make sure my changes go through, and I’m back to manage trees. Return into edit settings, and through to privacy settings. I’m a little over whelmed and confused by the settings on offer. Each setting has an “i” icon, that provides detailed explanation of each option. It’s a little confusing  as there is no simple public or private option. It feels like being searchable and allowing others to view my tree is interlinked into the first option. Erring on the side of caution, I switch off the include in search, and allowing photos to be copied, but leave on the two smart matching options. Click save, and then I notice the my member preferences and access links to the left.  The member preferences is less about the tree and more about me, so I leave them as is. The one of importance is the access page. The first three options all look innocent, so I leave them on. I decide to switch off the option to allow site members to invite other members to my site, and also switch off all the options for guests to view limited data on my site (without my permission). The last option for authenticated apps having access sounds secure too, so I leave the option on. Quite a handful. Maybe too much, but then I cannot complain as I’ve been given the options, if only I understood exactly what they meant.

MYH - 002 - privacy - combined

Genes Reunited – Genes have taken all the hassle and concern of public access away from you, by simple offering only the “private” option. That is to say all trees on Genes Reunited are searchable for matches, but  you must contact the owner before being given explicit permission to view their tree. There is one element that is worth mentioning, and it is maybe buried in an unlikely place. Bearing in mind you can only have one tree, the option is found under your account settings (and not the tree). Down near the bottom is hide living relations. It defaults to no, so I would recommend switching to yes for those that want to remain  most secure.

GR - 002 - privacy - combined

Well that’s about it for a first look at starting your tree and setting the privacy options. I will continue to evolve my tree on each of the sites, taking a critical and complimentary look at each of the features on offer.

Next time I look at adding a profile image.