Well delivery has remained on track this last month, with exciting new features going out this last Monday and two weeks earlier. I held off making any blog two weeks ago, mainly since I personally hadn’t managed to deliver my key feature on time, but we did manage to release it this time round. I felt I’d let down a lot of people, as it’s been in development for so long, but at the last minute it needed some changes, and I wasn’t feeling terribly proud. To be honest that was a little unfair on the rest of the team (developers, testers and our product manager) who had been working hard to deliver their bits. So before going into detail, here’s a quick summary of the items released over the last couple of weeks.
- Profile photos – making your tree look colourful and exciting.
- Notes and sources – add multiple notes and source details to a person, family, names, facts, etc.
- Attach photos – like notes and sources, you can now attach photos to other places across the tree.
- Surname information – courtesy of http://www.surnamedb.com.
- Hyperlinks in notes – links will been shown as hyperlinks that can take you to the actual location.
- Private notes and facts – to exclude information when sharing your tree.
- Add audio– to your media section and persons. Check out new findmypast Capture app.
- GEDCOM import – Currently limited to 10k persons, but we hope to open that all up soon.
Ok, so now for the detailed version. Starting with the last item.
GEDCOM IMPORT

It may seem an obvious item to build into any family tree product, but this one has been in development for a long time. When we started work on the import, the aim was to get as much information from the GEDCOM as possible and store it. And I think we’ve come pretty close in this first release, but unfortunately we’ve still got so much UI to develop, that you might not be able to visualise it all yet. We’ve also tried to take account of various different tweaks that the main genealogy apps have included, and we’ll be improving on this all the time. If you import your GEDCOM and you think it’s not right, then let me know.

The import option appears on the trees menu, the tree list page and also as a toggle on the Create a tree page. It’s very simple to use, click on the link, select your GEDCOM file (ones that end in .ged extension – we’ll be making it compatible with .zed and .uzed very soon) and then finish by clicking on Upload.

A tree will instantly be created bearing the same name as the GEDCOM file, and it will remain inactive until the load is finalised. If it’s a very small tree, it will probably load quickly, and you may find it is ready almost by the time you get the tree list back. Otherwise, you will see the upload status change every five seconds on this page. If for any reason it fails to load, it will advise you that Support are investigating. Please rest assured that we are watching this and it will get automatically loaded when we identify and resolve the issue. If you don’t want it investigated, the option to delete the import is there, so you can remove it.

Finally on completion of loading, it will advise you that a tree was created, how long it took and how many people are in it. And the tree title will become active.
Notes about the import
- It will import source repository, master source and source information. However our UI at the moment is basic (intentionally at this stage) so it will only show the title of the master source and the title/link of the source and the comments for the source.
- It will import and create custom fact types and allow you to reuse these custom fact types on other people after import. Creating new custom fact types in the UI will be available soon.
- It will import the meta data associated with any photos, and create empty instances of the media items and attach them where indicated by the GEDCOM. However, since the media is not included in the GEDCOM the pictures won’t be visible in your tree. The ability to re-add the photos will also be available at some stage, hopefully very soon.
- There is a current 10,000 person limitation on the import process. However we will let you upload the GEDCOM and will process them when we remove the limit.
- And please remember, there is NO limitation on the size of tree you can have on findmypast, even with a FREE account.
So if you have a tree elsewhere (not on findmypast) and want to see how your tree will look, use the GEDCOM export option from your current tree provider and give the http://www.findmypast.com tree a go.
PROFILE PHOTOS
The tree views are nice and structured, and hopefully clear, with their little pink and blue person icons (or grey if you don’t know which gender they were). But they are so much nicer when you have a photo or picture to help distinguish between the individuals. We’ve at last given you the basic option to select a photo from your tree media gallery and choose it for the profile of a person. And then, no matter what view your looking at, their profile photos will be displayed.

The process of setting the profile is very simple. Go to any of the profile views (Overview by default), and click on the pencil edit icon. This gives you the option to upload a new photo or use an existing one.
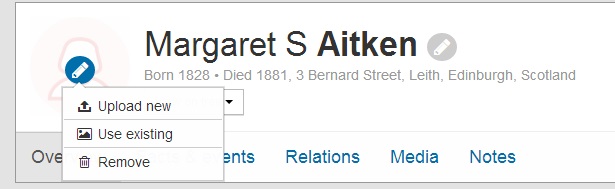
Uploading a new one lets you pick a photo from your own device. Using an existing photo will give you the chance to select from all existing photos attached to the tree you are currently working on.

The search feature will let you narrow down the photos displayed to ones that contain the search text in the title. Choose one and hit save. And you’ll now get a nice little round icon containing the photo across your tree.

Notes about the profile photo
- At present the profile selection just uses the default square portion of the image (this is either the square portion from the top if a portrait photo, or the centre section if a landscape photo). Selecting a portion within a photo (like we already offer on the old Genes Reunited tree) will be coming. At present I create a profile image offline in a square format, and upload both this and the original full size, but this is primarily so that my examples look right.
- The search on this page is basic at the moment, and we hope to offer filtering by a number of factors, and even possibly sharing photos across trees.
NOTES, SOURCES, MEDIA EVERYWHERE
We have now exposed the ability to add multiple sources, media items and notes to any fact through the Facts and events tab on Profile View or to any family unit through the Relations tab.

The approach to adding, editing and deleting items is consistent across the tree. The edit (pencil) and delete (dustbin) icons, will appear next to each unit, and they let you work exclusively on that part in a modal.
Notes about the media everywhere
- If you attach a media item to a fact or event, it will automatically bubble up and attach to the person and the tree. If you attach it to a family unit (on Relation tab), it will attach it to both persons involved. If you attach it to a family fact (marriage, etc.), it will attach it to both persons involved AND the family unit, so the picture will appear in all the places you would expect it to. My tip is to attach items at the lowest point and that will save lots of time. So if you have a wedding photo, attach it to the marriage event FIRST!
SURNAME INFORMATION
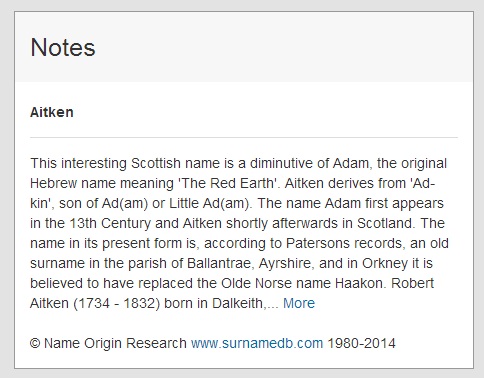
As long as our friends at http://www.surnamedb.com have the surname included on their database, we will endeavour to include this on the Overview tab of the Profile page. Just a nice little extra.
HYPERLINKS IN NOTES
Have you ever found something on the web pertaining to a relative, and want to just save the URL along with a bit of additional text? Add a Note, and include the http URL. Couldn’t be any more simple. Then when the tree displays the note, you can just click straight through. It will open this in a new browser window so that you don’t lose your place in the tree.

PRIVATE NOTES AND FACTS
You may be wanting to get your tree in shape ready for sharing, but there’s information that really you don’t want others to see. Addresses, illnesses, etc. We now let you specify a fact or note as private. When the option to share trees becomes available, these items will automatically be excluded from any display to the any other person viewing your tree. And don’t panic, on the Settings page there are options for both making your tree Public or Private, and for showing living relatives.

AUDIO – CAPTURE for iPHONE coming soon
The Media tab for a person now lets you add audio as well as photos to a person’s profile. The full benefit of this won’t be fully realised until the findmypast Capture app for iPhone (and soon after we hope Android) becomes available in the AppStore. Watch this space for more details http://www.findmypast.com/capture

So that’s it for the last two releases. Quite a lot to get stuck into, and as always everything is mobile compatible. In fact, I’ve really started to prefer building my tree on the iPad these days. And I’m lucky enough to have the opportunity to play with the Capture app, and it is something to get really excited about. Letting you add notes, photos and audio clips direct to the profiles of the people in your trees.
Finally, I’d just like to wish everyone who’s in Salt Lake City for RootsTech 2014 the very best. Make sure you come by and visit the findmypast stand. Sadly I didn’t get to go, but then we’ve important work to be getting on with in the tree!
BREAKING NEWS!!! The Import feature now supports UZED and ZED formats from the MyHeritage website and Family Tree Builder desktop application.


